Attic Intake Ventilation Products
DCI Products manufactures many types of attic intake ventilation products along with creating custom solutions for residential and commercial roofing projects.
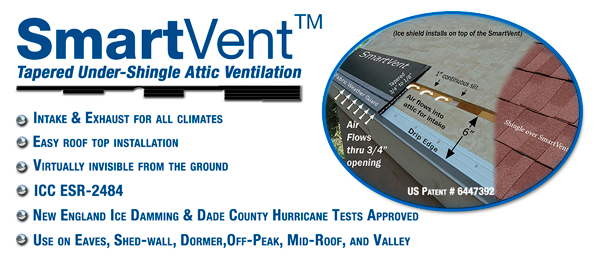
SmartVent
SmartVent is a tapered, under shingle plastic product designed for installation along the soffit edge of the roof or the facing edge of dormer rakes and goes virtually unnoticed.
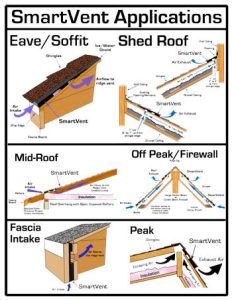
Below is a full listing of all SmartVent Applications.
SmartVent can be used solve many ventilation issues.
Click the image to download the Multi Use Reference Chart.
SmartVent
SmartVent is a tapered, under shingle plastic product designed for installation along the soffit edge of the roof or the facing edge of dormer rakes and goes virtually unnoticed.
SmartVent is so versatile that is can be used almost anywhere on the roof deck to provide intake or exhaust.
The applications below will provide you the information you need to insure proper ventilation.
Please contact info@dciproducts.com or call us at 610-622-4455
SmartVent at the Eave
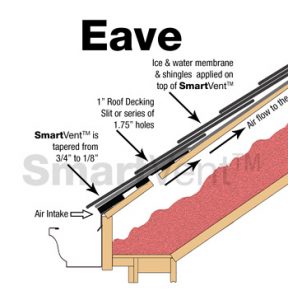
SmartVent installation at the eave.
The ideal choice for intake ventilation when under eave intake is not allowed by county and state regulations or when soffits do not exist. The eave application is the first pioneered and most popular application of SmartVent.
Our patented design has revolutionized the roofing industry with regards to attic ventilation.
Eave Installation details>>
SmartVent Tapered End Caps
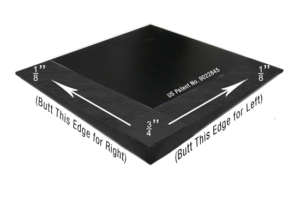
Click the image to visit the detailed information and installation instructions.
SmartVent End Caps are 10.5? square tapered ventilation pieces that seamlessly blend with Smartvent to give the roof a more aesthetic and clean finish to your intake ventilation project.
The patented ‘Universal’ SmartVent End Cap can be installed Right Side or Left Side, as you begin your SmartVent run or end the run. Designed with the contractor in mind, this easy to install end cap makes working with SmartVent simple and cost effective. Use it to end a SmartVent run near a dormer, valley, hip, chimney or skylight.
End Cap Installation details>>
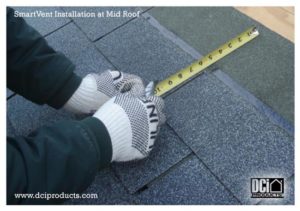
Mid Roof for Intake or Exhaust
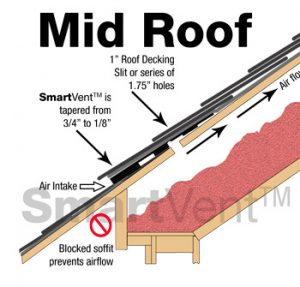
Mid roof installation of SmartVent as intake
When a home has blocked soffits, exposed rafter tails or knee walls, SmartVent should be installed following our midroof instructions. All attics need intake ventilation with all ridge vents in order to work efficiently. Using the enlargeable images as a guide, you may follow the instructions below to guide you through the installation process. If you are new to SmartVent, we suggest you view the Eave/Soffit instructions first to learn the basic techniques of of installing our product.
Mid-Roof Installation details>>
Off-Wall Shed Roof for Exhaust
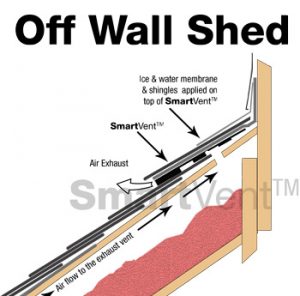
Click here to view SmartVent off wall shed application directions for exhaust ventilation
When re-roofing your shed roof, you should make sure you have the proper ventilation to maximize the life of the roof. The easiest way to accomplish this is by using SmartVent as an off-wall shed exhaust.
Off-Wall Shed Installation details>>
Shed Roof for Exhaust
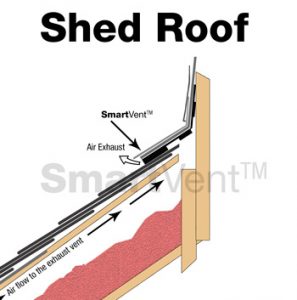
SmartVent shed roof application for exhaust ventilation
Ventilation made easy by using SmartVent on your next shed roof project. When installing a new roof and siding, the standard application of SmartVent on the shed roof is having the exhaust ventilation closest to the shed wall is always the most desired.
Shed Roof Installation details>>
Off Peak / Firewall
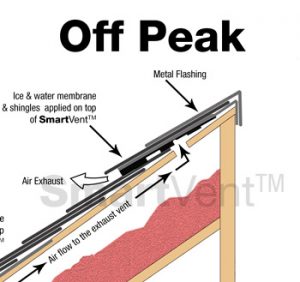
Off Peak installation of SmartVent for use as exhaust ventilation
SmartVent addresses the issue of trying to ventilate a unit that is sealed by a firewall. In normal conditions a ridge vent would be ideal, but when you need to ventilate without breaching the firewall, you need SmartVent.
SmartVent allows you to complete your ventilation by using an off-peak application which maintains the integrity of the unit. To provide perfect balance in your ventilation system SmartVent should be used as both intake and exhaust providing an optimum 9NFA/ft on each side.
Off-Peak Installation details>>
Dormer Peak Exhaust
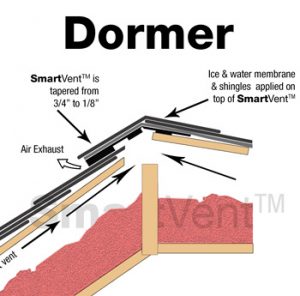
Click the image to visit the Dormer Peak details page
How to use SmartVent on a Dormer Peak
Using normal soffit vents or DCI’s revolutionary SmartVent system, cooler air enters the attic at the soffit level and is drawn up and out of the SmartVent vent acting as an exhaust. SmartVent’s single side venting creates excellent “negative air pressure” causing hot attic air to be literally pulled out of the structure that has a dormer peak. Use it on low slope dormer roofs with rubber or rolled roofing applied over the vent to seal.
Dormer Peak Installation details>>
Intake for Low Slope

SmartVent can be used on the fascia when a pitch is less than 4:12. Click the image to go to the details page.
SmartVent Low-Slope Application
SmartVent can be modified to provide intake ventilation for new roofs or re-roofs through the fascia board for low slope roof with less than a 4/12 pitch.
Look at our FasciaVent which has been designed more specifically for metal roofs and provides the intake ventilation for Flat to 16/12 pitches. Click here to see FasciaVent
Fascia Low-Slope Installation details>>
Installing SmartVent in a roof valley
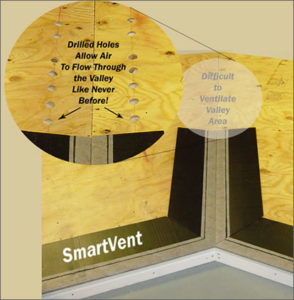
Click the image to visit the SmartVent Valley details pages.
SmartVent installed in the roof valley allows air to communicate between all the closed rafter spaces and the outside fresh air, your attic space can now cross ventilate in the valley allowing trapped, excessive moisture and heat to escape through
the ridge vent.
Roof Valley Installation details>>
Creating a Mitered Transition with SmartVent
Click the image to visit the detailed information on creating your won transitional, end cap.
SmartVent needs to be tapered to te roof deck wne approaching a vertical wall, exhaust pip, chimney or other obstruction. If SmartVent End Caps are not readily available, you can make your own on-site by following these directions. Click the image to learn more.
Mitering SmartVent details>>
Retro fitting SmartVent
 Retro fitting the SmartVent onto a roof, after determining where you’re going to install the product you will need to pull up at least 8 courses of shingles. This will allow you to install a full 3 foot wide sheet of Ice & Water Shield on top of the SmartVent and directly to the roof decking.
Retrofit Installation details>>
FasciaVent
FasciaVent allows air to enter through the fascia board, under the roof decking and out the ridge vent or other installed exhaust device.
Your gutter can be installed directly onto FasciaVent. FasciaVent is ideal for roofs that are less than 4/12 pitch.


Fascia Strip Vent™
Intake Ventilation whether you have a Soffit or Have No Soffit just a Fascia Board!