SmartRidge I
Single-Sided ridge vent with external baffle

U.S. Patent # 6447392
Installation Instructions
Before you start, decide which side the lift edge will be installed.
(Only use on slopes 3/12 and up)
STEP 1 : Prepare Roof Decking |
|
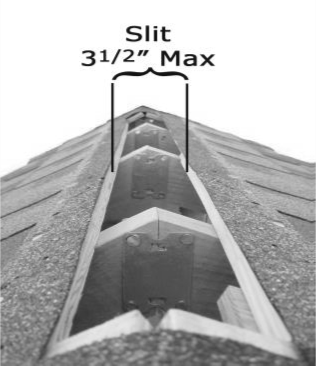
| The first step installing SmartRidge™ I is to prepare the roof decking by cutting or leaving a minimum 1” slit on both sides of the roof peak away from any ridge beam (do not cut at least 12” in from the gable ends or other obstacles). A total maximum width of 3.5” is required with or without a ridge beam. If wider ridge beams exist please call IPS with specific details first. This is most easily done by cutting the last piece of roof decking 1.75” short of the roof peak on both sides of the ridge leaving a 3.5” gap |
 |
STEP 2: Choose Side of Roof for Lift-up |
|
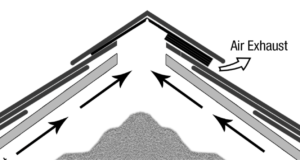
| Generally, the rear side of the house has the lift edge to allow the air to escape. |
 |
STEP 3: Installing SmartRidge™ I |
|
|
A nailing area on SmartRidge™ I is approximately 1.5″ in from the edges of the product on either side with minimum six nails per side equally spaced starting at the edge and ending at the opposite edge 1.5” in from each end. This is where you should nail when attaching SmartRidge™ I to the roof decking using 1 ½” – 2” roofing nails. Ensure nails penetrate all the way through the roof decking. (SIX NAILS PER SIDE EVENLY SPACED MINIMUM). Ensure both long edges are nailed tight against the roof with no gaps. Position the SmartRidge™ I three foot piece over the ridge so that it is nearly centered over the ridge opening. Butt the SmartRidge I against the end cap (or if using the fabric pieces to seal the end, wrap the fabric tightly around the end of the SmartRidge I piece ). Fold SmartRidge™ I over the ridge and secure to the roof decking/shingles using 1 ½” roofing nails minimum (ensure nail goes through the roof decking). Ensure both long edges of SmartRidge I are tightly nailed to the roof/shingles with no gaps between the vent and the roof.
|
|
Step 4: Continue install across the ridge. |
|
| Attaching the next pieces of SmartRidge™ I can be done by butting the end of the next piece up tightly against the end of the previously installed piece. Continue butting 3’ pieces of SmartRidge™ I until you reach the end of the roof. Cut the final piece to fit flush with gable end cap and/or repeat step 2 to seal the end & install gable end fabric. Ensure long edges have no gaps. | |
Step 5: Install Cap Shingles |
|
| Install cap shingles over SmartRidge™ I as you normally would. Ensure that about ½” of the shingle cap extends past the lift edge. Note: For aesthetic purposes, you can extend SmartRidge I all the way to the end of the gable roof without leaving it short of the gable end. SmartRidge™ I is strong enough to stand up to nail guns during shingle installation. Use extra long roof nails (1 ½” to 2” nails) for securing the shingle caps. Shingle Cap Nails should penetrate through vent and roof deck. Other installation techniques are available by calling DCI Products @ 800-622-4455. | |
Cross section diagram of SmartRidge I |
|
 Click here for the pdf of SmartRidge I Installation instructions.
