SmartVent – Roof Valley Application
Patent numbers 6,212,833 ,9,022,845 & 6,447,392 issued by the United States Patent & Trademark Office.
Valley Application
DCI Products proudly announces the only patented technology for ventilating
the valley areas a roof system. With air communicating between all the closed rafter spaces and the outside fresh air,
your attic space can now cross ventilate in the valley allowing trapped, excessive moisture and heat to escape through
the ridge vent.
Click on image to view larger image.

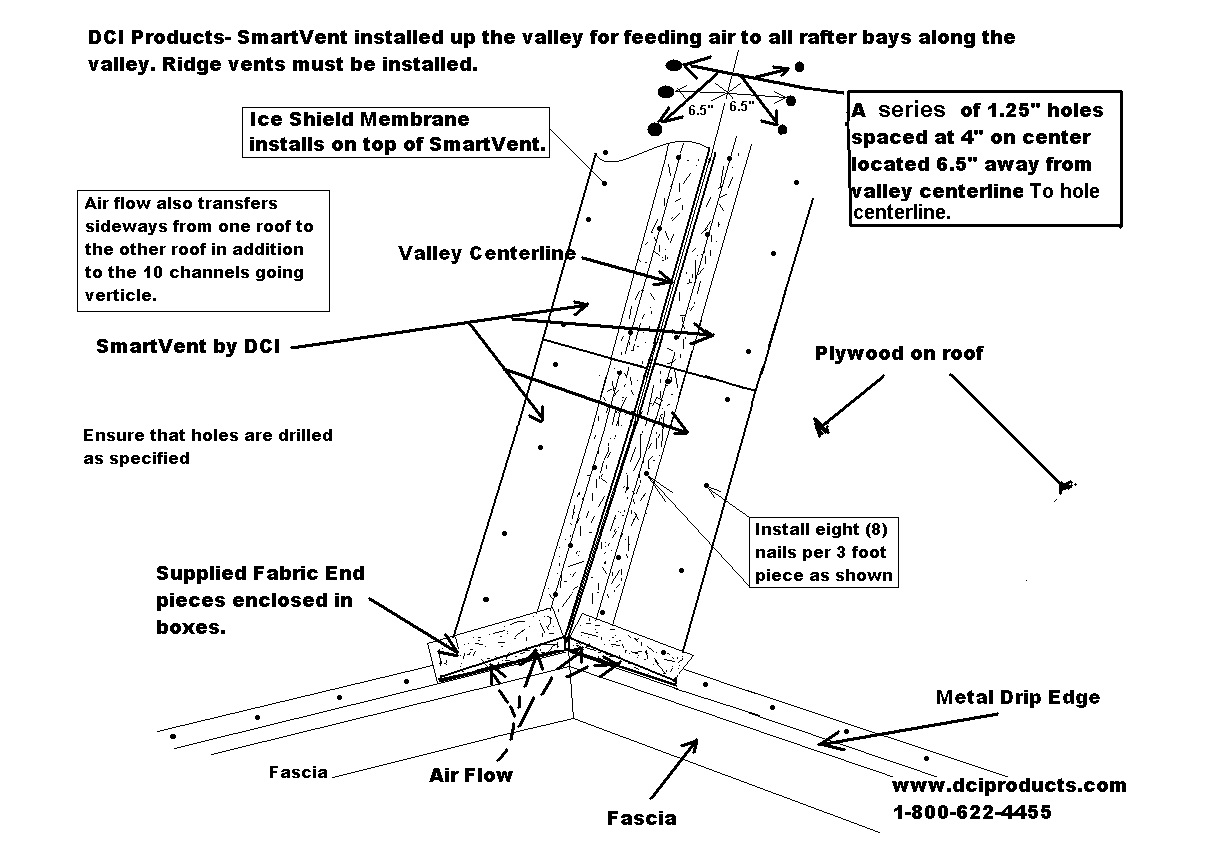
Valley Installation Instructions
Step 1: First strike a chalk line at 6½” away from the centerline of the valley on each side of the roof deck
Step2: Drill 1¾” holes at 3” on center along the chalk lines( or 15” wafer cuts at 6” intervals at 6” to 7” from the centerline). Do not drill through any rafters. Call DCI Products at 1-800-622-4455 if you have any questions on installation of SmartVent. Install a 12” x 12” square piece of ice and water membrane at the bottom edge of the plywood roof deck where it meets the metal drip edge and fascia board before installing the lower SmartVent piece. This membrane will cover the metal drip edge mitered joint completely.
Step 3: Install one SmartVent with the smooth side up and the thick edge towards the valley. Install a second SmartVent on the opposing side matching the thick edges together at the centerline. Install with eight nails, four along the upper edge and four nails along the lower edge of each SmartVent piece. Angle cut the SmartVent as shown in Figure 2. Please call DCI at 800-622-4455 with any questions.
Step 4: Make sure you install a 12” x 12” square piece of ice and water membrane at the bottom edge of the plywood roof deck where it meets the metal drip edge and fascia board before installing the lower SmartVent piece. This membrane will cover the metal drip edge mitered joint completely.
Cut and/or miter the SmartVent with a razor knife at the bottom and the top of the valley to conform to the valley angle. (Wrap the enclosed fabric on any exposed edges of SmartVent when installing.)
Step 5: Install your choice of valley protective membrane over the top of the SmartVent after the vent is installed. Continue your roof shingling per manufacturer’s directions.

Install your choice valley protective membrane over the top of the SmartVent. (Do Not Wrap the Bottom Exposed Edge Where the Fabric was Wrapped). Continue your roof shingling per manufacturers directions.
Questions about SmartVent?
Need to translate?