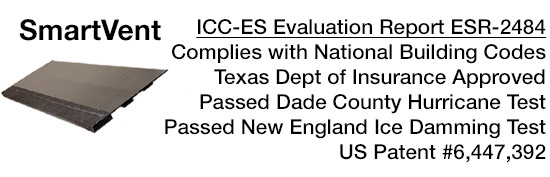
SmartVent
Off Wall and Shed Roof / Roof to Wall Application
Patent numbers 6,212,833 ,9,022,845 & 6,447,392 issued by the United States Patent & Trademark Office.

SmartVent installed as exhaust ventilation on a shed roof.
SmartVent installed as exhaust ventilation on a shed roof.
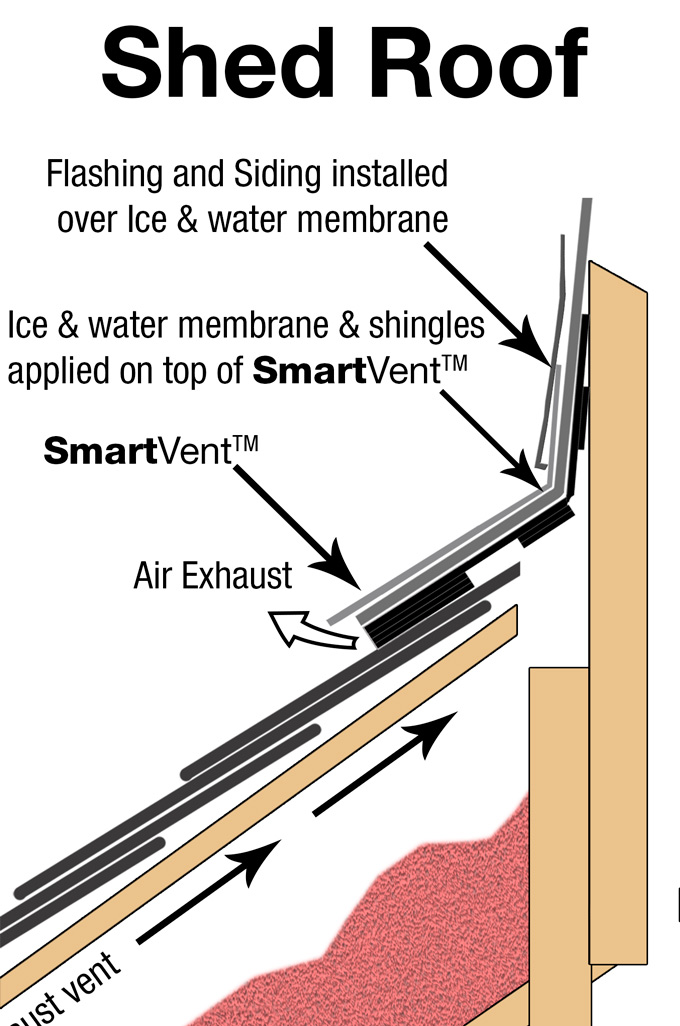
Ventilation of a Shed Roof / Roof to Wall
Simplify ventilation by using SmartVent on your next shed roof. When installing a new roof and siding, the preferred method is to place the exhaust ventilation as close to the shed wall as possible. This standard application ensures optimal airflow and performance, making your project more efficient and your shed better ventilated.
Click here for detailed installation instructions 
SmartVent installed for exhaust on a shed roof

SmartVent installed for exhaust on a shed roof
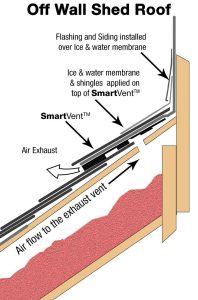
Off-Wall Shed Roof Ventilation
When re-roofing your shed roof, you should make sure you have the proper ventilation to maximize the life of the roof. The easiest way to accomplish this is by using SmartVent as an off-wall shed exhaust.Ventilating the shed roof without removing the existing flashing and siding off of the shed wall means one less hassle and one less chance of having the expense to replace the wall siding and losing the bid.
Click here for detailed installation instructions
SmartVent installed as exhaust ventilation on a shed roof.
Ventilation of a Shed Roof
Ventilation made easy by using SmartVent on your next shed roof project. When installing a new roof and siding, the standard application of SmartVent on the shed roof is having the exhaust ventilation closest to the shed wall is always the most desired.
Click here for detailed installation instructions
SmartVent installed for exhaust on a shed roof
Off-Wall Shed Roof Ventilation
When re-roofing your shed roof, you should make sure you have the proper ventilation to maximize the life of the roof. The easiest way to accomplish this is by using SmartVent as an off-wall shed exhaust.Ventilating the shed roof without removing the existing flashing and siding off of the shed wall means one less hassle and one less chance of having the expense to replace the wall siding and losing the bid.
Click here for detailed installation instructions
Shed Roof Ventilation Instructions |
 |
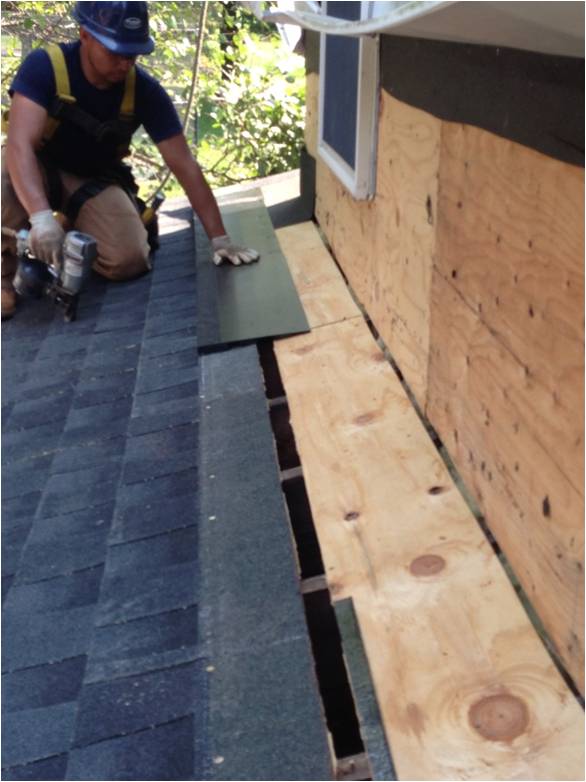
| Step 1 – Shingle up to the area that requires the SmartVent Roof to Wall vent application. Ensure there is proper continuous intake ventilation below proposed Roof to Wall ventilation. |
| Step 2 – Measure 3” out from the wall where the SmartVent will bend up on the wall. Strike a chalk line at the 3” mark along the roof decking and cut out the roof decking (leave about 12” of decking uncut at each roof edge or before any wall, valley, hip, etc.). Ensure the cuts do not penetrate the roof rafters. Remove roof decking and ensure there is at least 1” of clear space between roof decking and any header board. This allows the air to escape. Complete the shingling to the slit cutout but ensure the shingles do not cover the cutout opening. |
|
Step 3 – Install the SmartVent end fabric at the roof edge hanging half, 5.25”, beyond the roof edge and nailing fabric to roof deck (Note: The fabric can be folded to 5.25” X 10.5” to fit properly before nailing to cover the SmartVent roof edge. Fabric is not required on the section of SmartVent attached to the wall, only the roof area). Next, install the SmartVent by bending at the routed hinge and having the smooth side of the vent facing you. The rough side will be down against the roof and wall and nailed at 2” in from ends (along the black nail line in the fabric) and two nails evenly spaced between them. Nail the vent to the wall with matching spacing of nails. Ensure the vent is nailed at each edge 2” in. Nail length should penetrate through roof decking. Ensure the SmartVent is placed tight against the roof and wall before securing with nails. Butt each piece tightly against the previous one. Continue to the opposing roof end. |
| Step 4 – Complete the SmartVent end of the run by installing the end fabric at the shingle edge by folding one side over to make a 6” X 10.5” piece of fabric. Nail half on the roof (5.25”) and leave half ( 5.25”) hanging over the roof edge and placing the last cut piece of SmartVent over the fabric but even with shingle gable edge. Wrap the remaining fabric tightly over the top of the SmartVent even with the shingle end and nail. |
| Note – It is recommended to install ice shield on top of the SmartVent extending up the wall about 12” to ensure a weather tight seal, lapping under any house wrap so water can drain over the ice shield (any waterproof membrane will work instead of ice shield). Next, shingle above the SmartVent to the wall, overhanging the top shingle past the SmartVent lifted edge by ½” and then install a flashing that covers at least 4” of the shingle and extends up the wall at least 4”. Metal or vinyl flashing can be used. Ensure all openings in the wall above the roof to wall area are completely sealed such as lower and upper window corners and flashing details around windows, doors and trim boards. When metal flashing is used instead of shingles over the SmartVent, ensure the metal flashing over hangs the SmartVent lift end by ½” and up the wall 4” minimum. Secure flashing to wall. SmartVent is rated at 9 NFVA. |
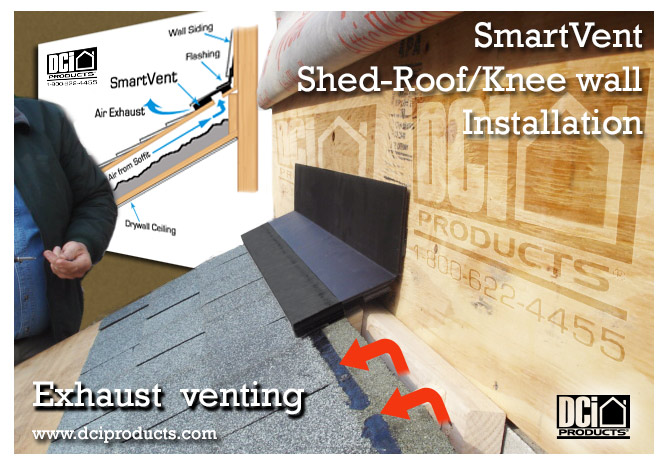
Off-Wall Shed Roof Ventilation Instructions
|
| Step 1 – Shingle up to the area that requires the SmartVent Roof to Wall vent application. |
| Step 2 – At the location of the shingle course (where the SmartVent is to be located) measure up from the bottom of the shingle (the weather edge) 6” to 7” or 6½” to 7½” before installing the actual shingle. |
| Step 3 – Make lines at the 6” to 7” or 6½” to 7½” marks and cut through the top of the previously installed shingle and the plywood only.(or 1.75” holes @ 3” centers) Do not cut the rafters! |
| Step 4 – Remove the plywood decking after the continuous cut and ensure the air flow is open from the shed wall vent to the soffit area. |
| Step 5 – Using the fabric at the rake edge or a SmartVent End Cap, nail the SmartVent similar to the eave detail CROSS SECTION but make it even with the bottom edge of the course of shingle next to be installed. Use a minimum of four nails across the lift edge starting 2” in from the edges. Use nail line in fabric. Align matching nails at the top of vent. |
| Step 6 – Apply a roll of ice shield on top of the SmartVent even at the lower lift edge and directly to the plywood above the vent. If tarpaper was already installed, gently tuck the ice shield under the higher course of tarpaper so it laps over the ice shield by at least three inches or more. Ensure ice shield adheres to SmartVent and wood decking, not installed over tarpaper. |
| Step 7 – Install a starter course of shingle slightly overhanging the SmartVent bottom edge about ½”. Align shingles per manufacturers’ directions starting at ½” overhang. |
| Step 8 Install the shingles over the starter course and continue shingling up the roof. The installation at the mid-roof is very similar to that of the eaves edge. If you have any questions or comments on installation please call 1-800-622-4455 and ask for a roof ventilation technician to assist you. |
| Note – Stop any roof deck 1” cuts about 12” from rake edges, dormer walls or valley areas, or at ends of the SmartVent runs, etc. Use the enclosed fabric at the open ends of SmartVent to seal for weather and insects. Cut SmartVent even at the rake edges, miter SmartVent in the valley and hip areas and return miter SmartVent to end at locations inside the roof edging. The ‘return miter’ is available to see on our website or call to receive this installation detail. |
These directions can be found on Page 4 in the SmartVent installation instructions.
Click here to download.
Need to translate?