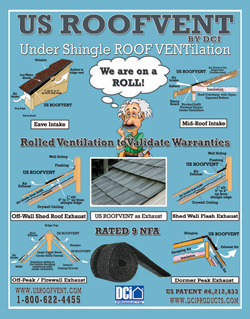
If you are a roofer that prefers rolled products,
here is your solution for intake and exhaust ventilation.
Click the image to download the PDF
US RoofVent is the latest, innovative product from DCI Products. With the major success achieved by the SmartVent over the past fifteen years, we wanted to offer the contractor a rolled version, but with all the same great benefits. . US RoofVent helps eliminate mold and moisture issues and is virtually unnoticeable once installed. Twenty feet per roll, it is lightweight, easy to handle and has the same versatility as our industry standard product SmartVent.
- Effortless Ventilation: This rolled design provides simple application along the eave, making it a reliable choice for enhancing attic airflow using a roof vent. The vent lies flat against the decking, making installation efficient for professionals managing airflow via roof vent solutions. Each roll is twenty feet long, ideal for any roof vents for a house project.
- Smart Installation Process: Begin at the gable edge and align the vent along the drip edge to simplify roofing workflow with a roof vent system. A smooth top side makes installation easy while the fabric protects from the elements- ideal for systems requiring a roof intake or exhaust vent. The tapered body blends seamlessly, even on uneven roofs, pairing well with any roof vent layout.
- Designed for Contractors: Roofers will appreciate the fabric wrap technique, which aids proper end finishing and ensures continuity using smart vent accessories. Heavy-duty scissors allow simple roll adjustments-essential when adapting to on-site needs in roof intake vent installs. Works in conjunction with full-width membrane applications and other rolled roof vent systems.
- Universal Application Range: This vent is compatible with re-roofing, new builds, and retrofits, offering efficiency without additional modifications-especially in roof venting roll installations. The non-lift edge nails down firmly, maintaining consistent form for jobs involving complex roof intake vent conditions. Pairs well with shingle-over designs and roof vents architecture.
- Flexible Finish Options: The vent can be cut to size to fit between ridges, peaks, and valleys, and it adjusts easily for different pitch styles, making it a go-to roof intake or exhaust vent product. When combined with tapered end caps, installers can taper edges cleanly, particularly in complex roof venting roll layouts. Built to meet expectations for modern roof vents for house installations.
Watch the video to learn about US RoofVent
Download US RoofVent Directions Here ![]()
Installation instructions for US RoofVent |
|
|---|---|
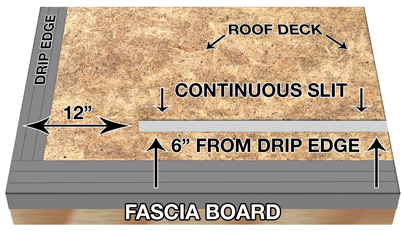 |
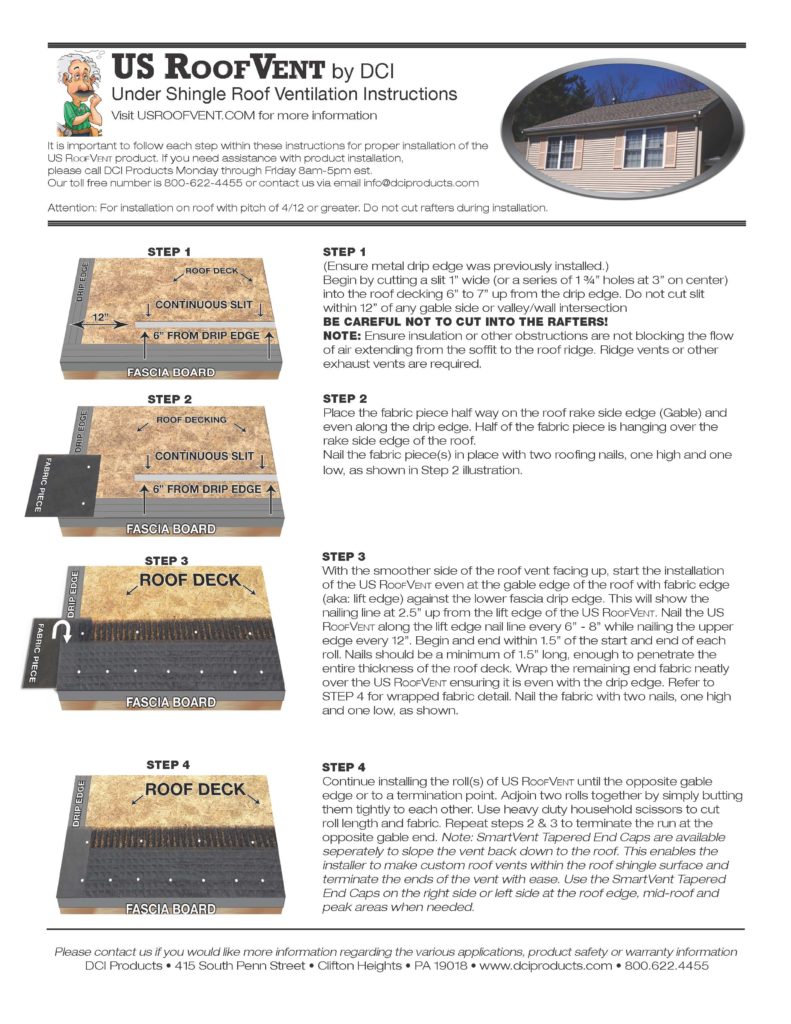
STEP 1
(Ensure metal drip edge was previously installed.) Begin by cutting a slit 1” wide (or a series of 1 ¾” holes at 3” on-center) into the roof decking 6” to 7” up from the drip edge. Do not cut slit within 12” of any side or valley/wall intersection BE CAREFUL NOT TO CUT INTO THE RAFTERS! NOTE: Ensure insulation or other obstructions are not blocking the flow of air extending from the soffit to the roof ridge. Ridge vents or other exhaust vents are required. |
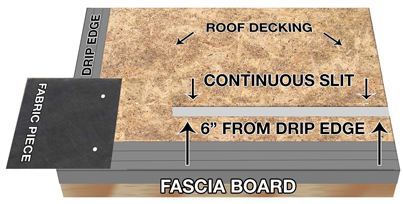 |
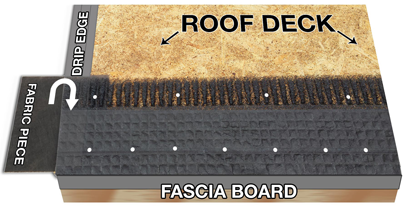
STEP 2
Place the fabric piece half way on the roof rake side edge(Gable) and even along the drip edge. Half of the fabric piece is hanging over the rake side edge(Gable) of the roof. Nail the fabric piece(s) in place with two (2) roofing nails, one high and one low. |
 |
STEP 3 |
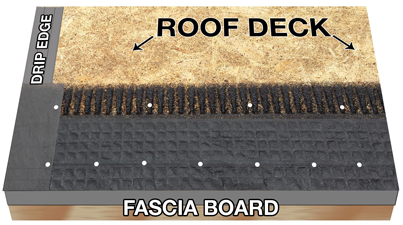 |
STEP 4
Continue installing the roll(s) of U.S. ROOFVENT until the opposite gable edge or to a termination point. Adjoin two rolls together by simply butting them tightly to each other when installing multiple rolls. Use heavy duty household scissors to cut roll length and fabric. Repeat steps 2 & 3 to terminate the run at the opposite gable end. Note: SmartVent Tapered End Caps are available ‘separately’ to slope the vent back down to the roof. This enables the installer to make custom roof vents within the roof shingle surface and terminate the ends of the vent with ease. Use the SmartVent Tapered End Caps on the right side or left side at the roof edge, mid-roof and peak areas. Refer to enclosed details for more information. |
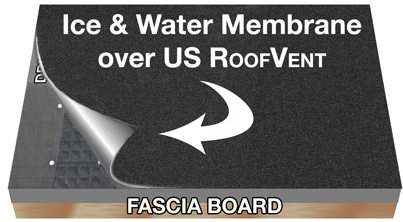 |
STEP 5
Install ice and water membrane “on top” of the U.S. ROOF VENT. Full width ice and water membrane (36”) is required to be installed over the U.S. ROOF VENT in all environments. Ensure the upper underlayments are lapped over the lower underlayments. Please call the DCI Technical department with any questions. |
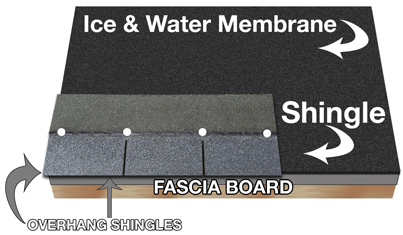 |
STEP 6
Shingle the roof as usual. Beginning with a starter course, always overhang shingles at least by ½”.You now have proper intake ventilation to the attic. NOTE: Secure starter course shingles to the roof deck at the ¾” lifted edge of the U.S. ROOF VENT with nails that penetrate through the roof sheathing. (Generally 1½” roofing nails are used on new roofs.) Shingles must overhang the U.S. ROOF VENT lifted edge ½” minimum to 1” maximum. Refer to shingle manufacturer application manual. Please call the DCI Technical department with any questions. |
NOTE:US RoofVent can be installed under virtually any shingle course using proper installation techniques.US RoofVent should be installed on shingled roofs with a minimum of 3/12 pitch. There is no maximum slope limitation. Low slope roofs with less than 3/12 pitch can use FasciaVent by DCI for intake ventilation. Use of continuous ridge vents or other exhaust vents are required. No Moisture from household appliances, equipment or fixtures can be discharged into the attic area
Questions about US RoofVent? Let us know!
Need to translate?
