How to install Flo-Free Leaf Guard
Getting Started
Installing
Flo-Free is so easy! You don’t need any special tools and it comes pre-cut to fit into your 5K or 6K gutter system. Before you begin your installation, check to make sure your gutters and downspouts are clean and in reasonably good condition.
You should have the following tools and supplies available before starting your installation:
- Extension ladder or access to your roof. *
- A pair of ordinary cutting scissors or razor.
- Caulk gun with black silicone caulk.
STEP 1 INSTALL END PIECE
A. Begin at one end of your gutter. Take your first piece of Flo-Free and, with the smooth side up, lay it over your gutter allowing it to hang over the end of your gutter by approximately 2 inches (see figure 1). Notch the 2 overhang as shown below. This overhang portion will be used to seal the end of your gutter.
B. If there are any hanging brackets under the pieces of Flo-Free, mark their position with your finger and make a “T” cut as shown below approximately 3′ long in from the back edge of the Flo-Free piece. At the top of the “T” make a 1′ cut in either direction. This will enable Flo-Free to fit around the hanging bracket and move slightly left or right to get a tight fit.
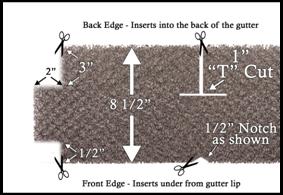
Figure 1. View from above looking down to the gutte
Note:
Hanging brackets differ from gutter to gutter. Back cut & “T” cut should be adjusted accordingly.
C. Tuck the back edge of the Flo-Free piece down into the gutter until it is resting on the bottom of the gutter. Make a “V” notch in the front edge of the Flo-Free piece at the location of the hanging bracket (if necessary). Tuck the front edge of the Flo-Free piece into the channel along the top front edge of the gutter (see figure 2).
D. Tuck the 2″ notched end piece into the gutter to seal the end of the gutter.
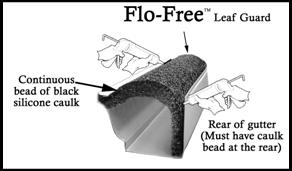
Figure 2. Side view of Flo-Free installation
E. In order to ensure Flo-Free remains snugly in your gutter, we recommend putting a continuous bead of black
silicone caulk along the part of the Flo-Free screen that fits under the gutter channel (see figure 3 below). Simply press down on the Flo-Free screen under the gutter channel to create a gap, while you apply the silicone caulk. A continuous bead of silicone must be installed at the rear of the gutter behind
the Flo-Free to secure it to the gutter (see fig. 2).
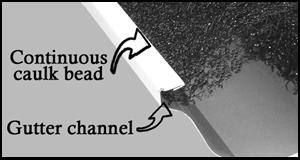
Figure 3 Applying Caulk Bead
STEP 2 INSTALL REMAINING PIECES
Repeat steps 1B, 1C, and 1E for each piece of Flo-Free needed to cover your entire gutter. Make sure to butt each piece of Flo-Free up tightly against the previous piece so that no gaps in coverage exist.
When you reach the other end of the gutter, make sure to allow for a 2″ overhang (and notch appropriately) as you did with the first piece. This will seal the other end of the gutter.
STEP 3 Installing Miter Corners and Angled Gutter Runs
Some Flo-Free customers have additional cuts to make for inside/outside corners and angled gutter runs (used for Turrets, Pagodas, etc.). They are easy to cut but sometimes difficult to fit because of anchor screws and extra support at the corners (bends). *
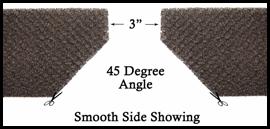
A. Outside Corners (90 Degrees Corners) Using two pieces of Flo-Free cut as detailed in Figure 4.
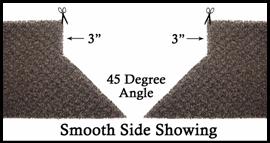

Install with the smooth side up, applying a bead of silicone caulk as per Figure 3.
Figure 4
B. Inside Corners (90 degrees Corners) Using two pieces of Flo-Free cut as detailed in Figure 5.
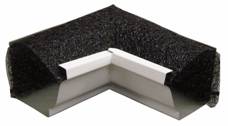
Install with the smooth side up applying a bead of silicone caulk as per Figure 3, however, inside corners should be heavily caulked along the rear edge of the gutter.
Figure 5
C. Turrets, Pagodas, etc. (Less than 90 degrees Corners) Using two pieces of Flo-Free cut as detailed in Figure 6.
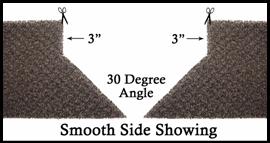
Install with the smooth side up, applying a bead of silicone caulk as per Figure 3.
Figure 6
1-800-622-4455
www.dciproducts.com
Also available at DCI:
- Black Silicone caulk (10.2 oz) – Specifications sheet
- Custom Flo-Free orders also available
