SmartVent – Off Peak Application
Patent numbers 6,212,833 ,9,022,845 & 6,447,392 issued by the United States Patent & Trademark Office.

When to Use SmartVent as an Off-Peak Exhaust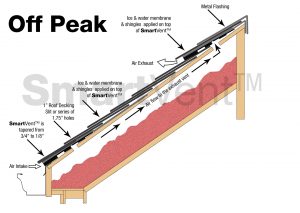
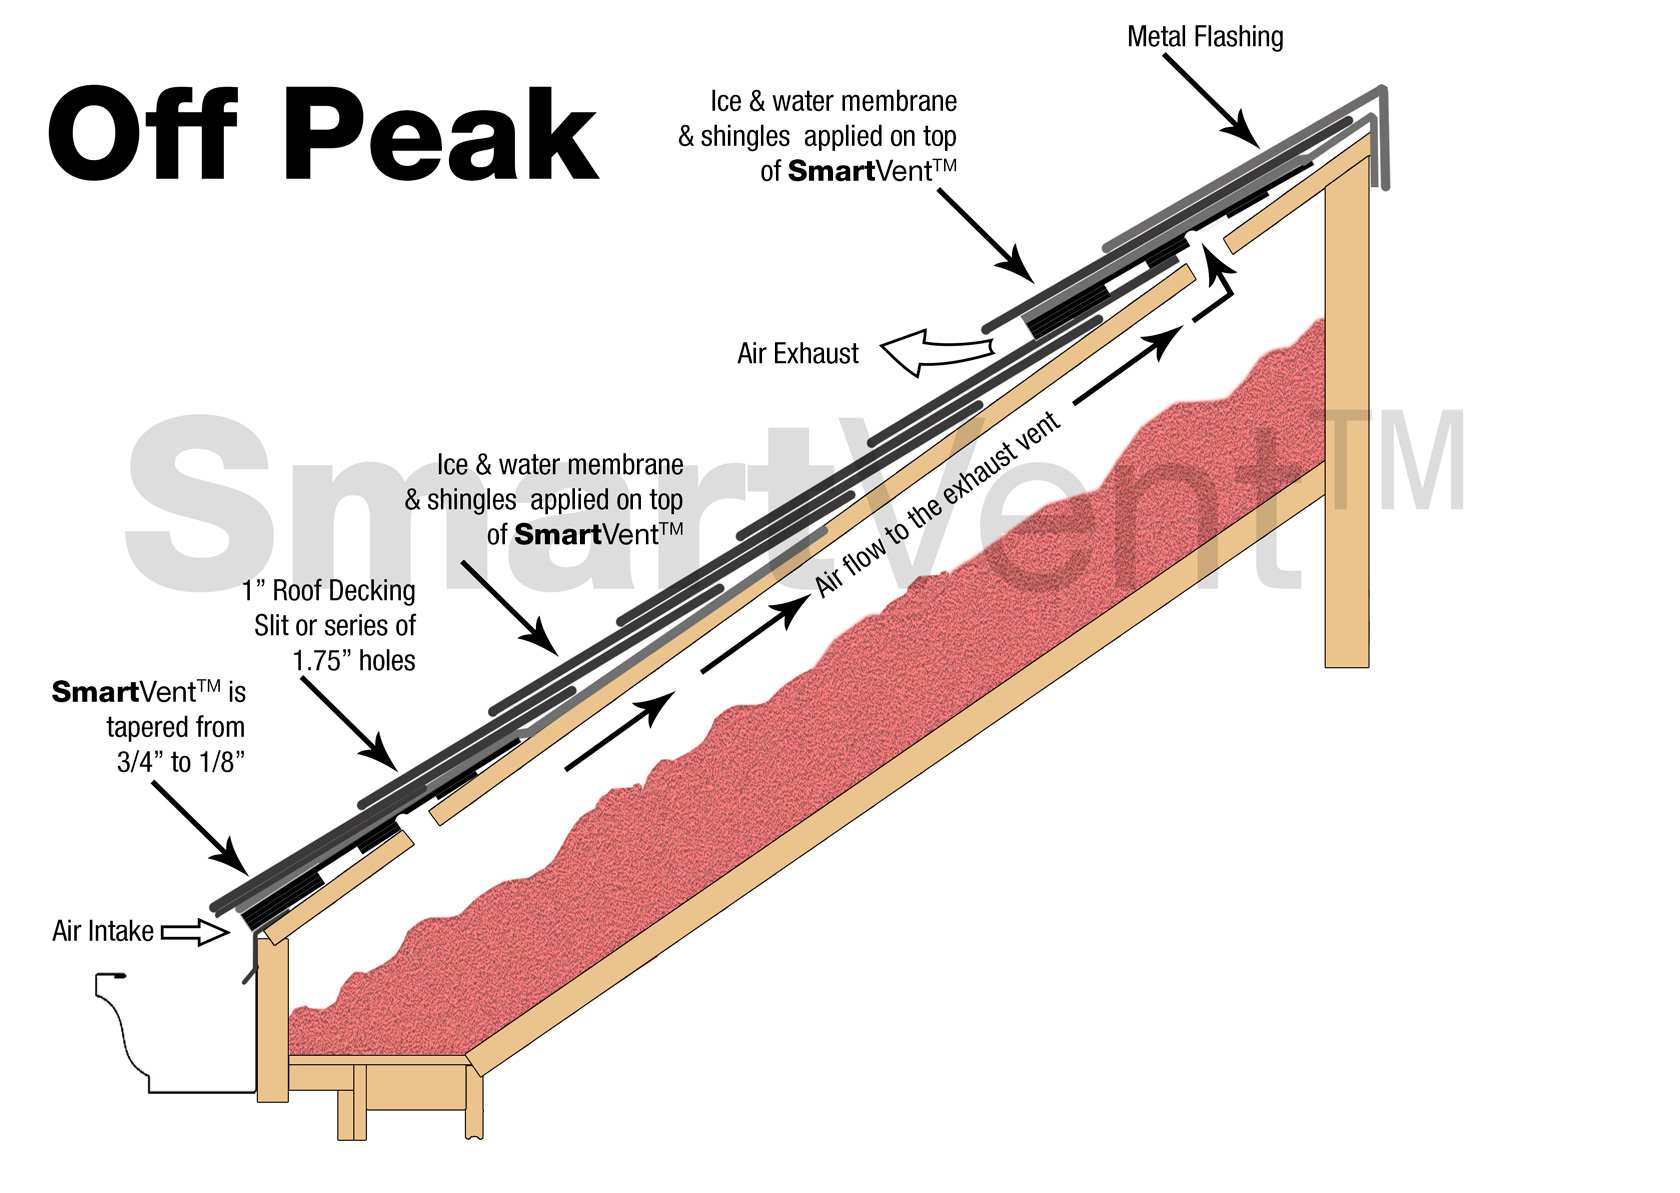
SmartVent addresses the issue of trying to ventilate a unit that is sealed by a firewall. In normal conditions a ridge vent would be ideal, but when you need to ventilate without breaching the firewall, you need SmartVent.
SmartVent allows you to complete your ventilation by using an off-peak application which maintains the integrity of the unit. To provide perfect balance in your ventilation system SmartVent should be used as both intake and exhaust providing an optimum 9NFA/ft on each side.
Follow these directions to properly install SmartVent in the Off-Peak exhaust application.
Step 1: Shingle up to the area..
Shingle up to the area that requires SmartVentTM.
• Do not install any underlayment or shingles above the location of the SmartVentTM prior to the completion of SmartVent installation.
• Cut or stop underlayment at top of shingle course where 1” slit will be cut.
• Ensure there is a minimum 1” clear rafter width air space from soffit to ridge.

Step 2 : Make lines at 6” to 7” or 6½” to 7½”
Make lines at the 6” to 7” or 6½” to 7½” marks as shown below.
• At the location of the shingle course (where the SmartVentTM is to be located) measure up from the bottom edge of that shingle 6” to 7” or 6½” to 7½” before installing that course of shingle.
• Strike chalk lines to mark the 1” cutout. Use a circular saw to cut plywood. Do Not Cut
Into Rafters!
• See step 3 before cutting through the top of the previously installed shingle and plywood along the chalk lines.

Step 3 : Create the intake slot
- When cutting the 1” slit, stay 12” in from the roof edges, walls, valleys, hips, pipes or any other obstruction. Use a circular saw.
- Using the circular saw, use safety when cutting and set blade depth so you do NOT cut into the rafters!

Step 4 : Remove the decking
- Remove the plywood decking after the continuous cut and ensure the airflow is unobstructed from the cut slit to the ridge or off-ridge exhaust vent.
- Ensure insulation is not blocking airflow.
- Ensure the full roll width of ice shield installs on top of SmartVentTM.
- Shingles must have a 1/2” overhang beyond the lifted edge of the vent.
Step 5 : Installing the SmartVent
- Nail the SmartVentTM so that it is even with the bottom of the edge where the next course of shingle would be installed.
- If starting at the rake edge, install the fabric method by wrapping the fabric around the end of the vent (see SmartVent eave vent directions steps 2, 3 & 4). If starting or ending within the shingled area follow the SmartVent Tapered End Cap
installation page. - Starting 2” from each end of the SmartVentTM piece, nail the SmartVent to the roof decking at the top edge with 4 nails spaced evenly See Step 4 image.
- Nail the bottom with four nails matching the spacing of the top row of nails at the nail line in the fabric.

Step 6 : Apply Ice & Water Membrane
- Apply a roll of ice and water membrane on top of the SmartVent and directly to the plywood above the SmartVent.
- If underlayment was already installed, tuck the ice and water membrane under the higher course of underlayment so there is a 3” overlap.
- Ensure the ice and water membrane adheres to the SmartVent and wood decking and not the existing underlayment.

Step 7 : Shingle Starter Course
- Install a starter course of shingle overhanging the SmartVent edge by at least 1/2” and not more than 3/4”.
Do Not install shingles even with the vent, they must overhang.
Off-Peak installation directions for SmartVent can be found on page 3 of the direction set. Click here to download your printable copy.
What is SmartVent?
SmartVent is a tapered, under shingle plastic product designed for installation
along the soffit edge of the roof or the facing edge of dormer rakes and goes virtually unnoticed. It allows air to
flow freely through the 1″ roof decking slit providing more than adequate soffit ventilation to maximize ridge
vent effectiveness. This is extremely important since most ridge vent products require an equal amount of ventilation at the soffit in
order to work properly. SmartVent, when used at both soffits, has a total NFA rating of 18 sq. in. per foot(or 9 sq. in. per foot on each side of a standard gable roof).
Click here for SmartVent Specifications
Most houses with ridge vents do not have the proper soffit ventilation required because attic insulation blocks the
soffit vents. SmartVent allows cooler air to enter under the shingle, through the 1″ roof slit and out the ridge
vent providing superior air flow and attic cooling.
Click here for an expanding list of SmartVent Dealers. If no dealer is located near you please give us a call at 1-800-622-4455 and we will be happy to locate a dealer for you.
Questions about SmartVent?
Need to translate?