Fascia Strip Vent™ – Intake Ventilation
Intake Ventilation whether you have a Soffit or Have No Soffit and just a Fascia Board! Plus, you can retrofit this on an existing roof without removing the shingles!
 |
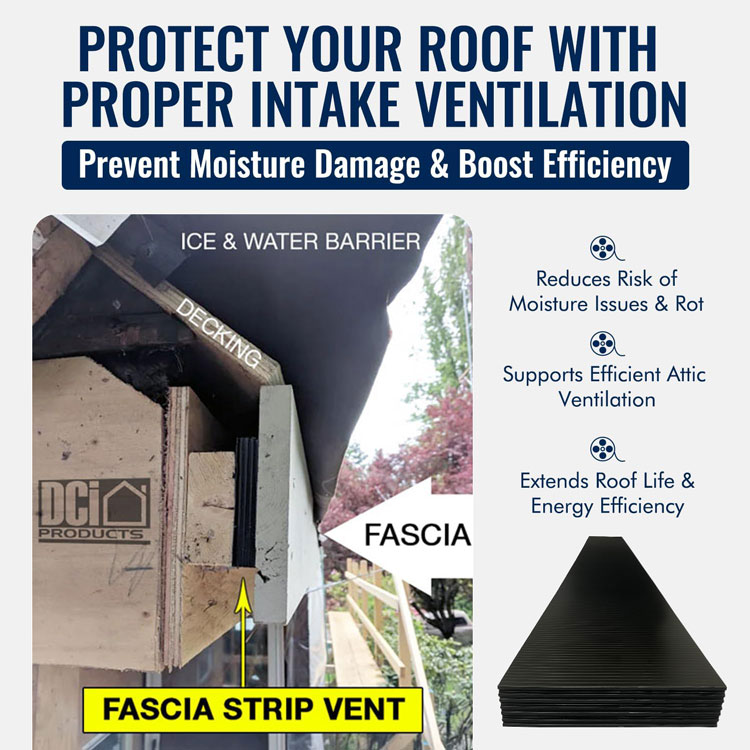 |
- Ventilation Design: Our fascia strip vent allows air intake through the fascia board, supporting airflow beneath the roof decking. This product acts as a fascia intake vent, providing a clear path for ventilation. It meets the building code fascia vent standards, ensuring proper air movement. Our continuous fascia strip vent design supports consistent ventilation along the roofline.
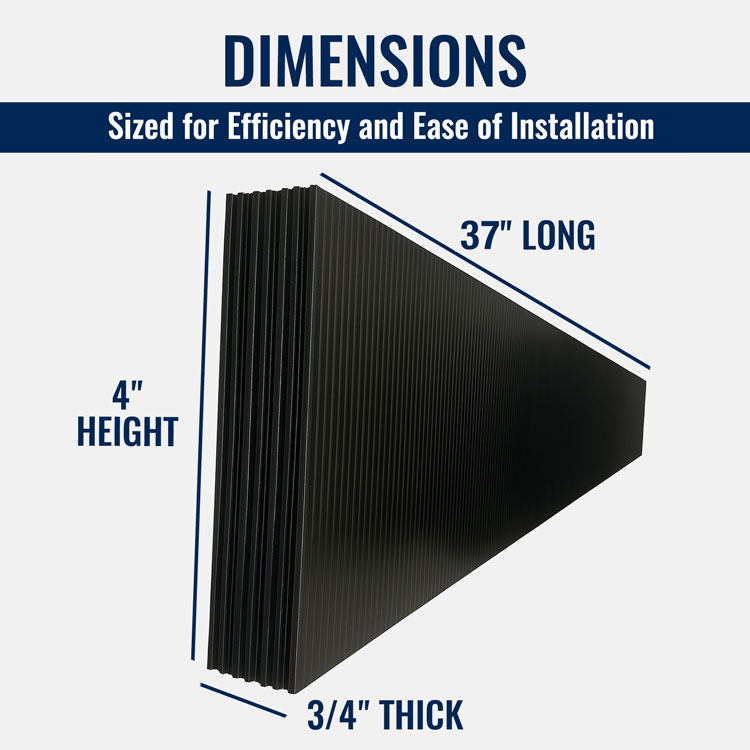
- Roof Compatibility: Ideal for roofs without soffits, this fascia strip vent fits neatly under roofing materials. It functions effectively as a vent strip fascia for metal and asphalt roofs. This 37-inch fascia vent length offers wide coverage. Its compatibility with various roof edge vent strips supports flexible installation options.
- Airflow Efficiency: Designed to facilitate attic airflow, this product serves as an attic intake fascia that channels fresh air under shingles or shakes. It works with the NFA 9 vent strip rating to meet ventilation requirements. This fascia ventilation strip helps reduce trapped heat, contributing to stable roof conditions. This vent also doubles as a soffit vent alternative where soffits are absent.
- Installation Ease: This strip vent for soffit installs easily before roofing panels or shingles are applied. It integrates with other roof vents to complete a balanced ventilation system. Our fascia ventilation strip allows roofs to be mounted directly, preserving functionality. Its design supports retrofit and new construction projects.
- Versatile Application: Compatible with fascia cedar roofing materials, this vent functions as both a cedar shake and a cedar shingle. It addresses ventilation needs for coastal and inland homes alike. Our vent strip for the roofline adapts to a variety of architectural styles. Additional ventilation accessories can be added for oversized fascia boards.
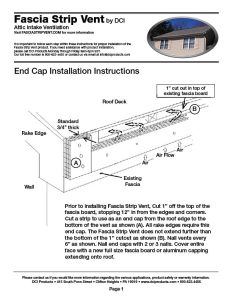 Installation instructions from the PDF. Please refer to the download to view the figure references.
Prior to installing Fascia Strip Vent, Cut 1” off the top of the fascia board, stopping 12” in from the edges and corners.
Cut a strip to use as an end cap from the roof edge to the bottom of the vent as shown (A).
All rake edges require this end cap. The Fascia Strip Vent does not extend further than the bottom of the 1” cutout as shown (B). Nail vents every 6” as shown. Nail end caps with 2 or 3 nails. Cover entire face with a new full size fascia board or aluminum capping extending onto roof.
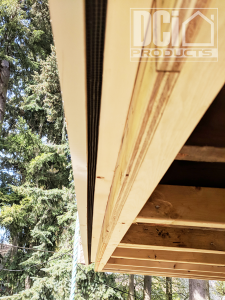
Step 1: Cut the top of the fascia board (A) 1” below roof deck for airflow ensuring insulation is not blocking the flow. Figure 1
Step 2: Nail Fascia Strip Vent (B) to old fascia board as shown not extending higher than top of fascia board (A). See reverse side for End Cap directions to start and stop vent runs.
Step 3: Nail new fascia board over Fascia Strip Vent or install aluminum capping (C) as shown in Figure 2.
Step 4: Optional to install DCI SoffitGuard (D) edging when using a rain gutter (E).
Here is an application with a 4” x ¾” x 37″ Fascia Strip Vent.
This will give you 9 sq. In of NFA per foot for intake.
The fascia board easily gets installed over the Fascia Strip Vent.
We make custom sizes to fit the needs of your job.
“The venting was easy to install and the clients are very happy with the finished appearance.” – Nathan C. from WA


Do you have a need for custom ventilation solutions? Fill out the form at the bottom of the page and let us know what you need to vent and we can solve almost any need.
Need to translate?
Do you have questions about Fascia Strip Vent?