SmartRidge II - Externally Baffled double-sided attic ridge ventilation.
Installation Instructions

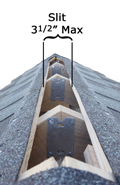
Figure A
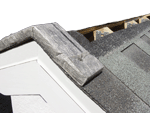
Figure B
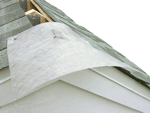
Figure C
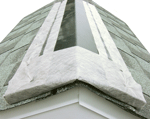
Figure D
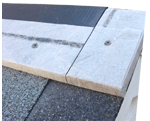
Figure E
Figure F
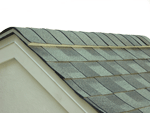
Figure G
STEP 1: Prepare Roof Decking (Fig. A)
The first step installing SmartRidge II is to prepare the roof decking by cutting or leaving a 1” slit (do not cut at least 12” in from the gable ends or other obstacles) on both sides of the roof peak away from any ridge beam. This is most easily done when laying the roof decking by cutting the last piece of roof decking 1 ½” short of the roof peak (Fig A).
STEP 2 Attach SmartRidge II End Piece (Fig. B)
After roof shingles are installed, begin at one end of the roof. A nailing strip can be found on SmartRidge II approximately 2″ in from the edge of the product. This is where you should nail when attaching SmartRidge II to the roof decking using 1 ½” – 2” roofing nails.
In the SmartRidge II box are pieces of fabric (approx. 10 ½” square) and two end caps that will be used to seal the gable ends (Fig B). Install end caps or wrap the fabric around the end of a piece of SmartRidge II so that an equal amount of fabric is on top and on the bottom (Fig C).
Position the SmartRidge II piece over the ridge so that it is nearly centered over the ridge opening. Butt the SmartRidge II against the end cap or, if using the fabric pieces to seal the end, wrap the fabric tightly around the end of the SmartRidge II piece (Fig D). Fold SmartRidge II over the ridge and secure to the roof decking using 1 ½” roofing nails minimum. Other installation techniques are available by calling DCI at 1-800-622-4455 (engineering department).
STEP 3 Attach Remaining SmartRidge II Pieces
Attaching the next pieces of SmartRidge II can be done by butting the end of the next piece up tightly against the end of the previously installed piece (Fig E). Continue butting 3’ pieces of SmartRidge II until you reach the end of the roof. Cut the final piece to fit flush with gable end cap and/or repeat step 2 to seal the end & install gable end fabric. Nails 1 ½” in from each edge and two additional nails spaced at 11″ apart on each side totaling 8 nails per piece of SmartRidge II.
STEP 4 Install Cap Shingles
Install cap shingles over SmartRidge II as you normally would (Fig F). Note: For aesthetic purposes, you can extend SmartRidge II all the way to the end of the gable roof (Fig G). SmartRidge II is strong enough to stand up to nail guns during shingle installation and use extra long roof nails (1 ½” to 2” nails) for securing the shingles. Nails should penetrate through roof deck.
To download a printable .pdf file click here.