SmartVent – Dormer Application
Patent numbers 6,212,833 ,9,022,845 & 6,447,392 issued by the United States Patent & Trademark Office.

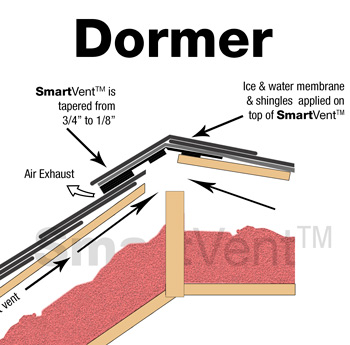
How to use SmartVent on a Dormer Peak
Using normal soffit vents or DCI’s revolutionary SmartVent system, cooler air enters the attic at the soffit level and is drawn up and out of the SmartVent vent acting as an exhaust. SmartVent’s single side venting creates excellent “negative air pressure” causing hot attic air to be literally pulled out of the structure that has a dormer peak. Use it on low slope dormer roofs with rubber or rolled roofing applied over the vent to seal.
Step 1: Prepare Roof Decking
The first step is to prepare the roof decking by cutting or leaving a 1” slit on both sides of the roof peak away from any 1½” ridge beam (a total width of 3 ½” is
required with or without a ridge beam and that is the maximum width). Do not cut at least 12” in from the gable ends or other obstacles. This is most easily done when
laying the roof decking by cutting the last piece of roof decking 1 ¾” short of the roof peak on both sides of the ridge.
NOTE: The proper amount of soffit ventilation is required to maximize your ridge vent effectiveness. Wider ridge beams above 1 ½” require special installation techniques. Contact DCI Products
for more information.
Step 2 : Install shingles & SmartVent
Install Shingles & SmartVent on Lift Side First Which is the Steeper Pitch Side at 4/12 or Greater.
After roof shingles are installed on the lift side of the roof, begin at one end of the roof. A nailing area on SmartVent is approximately 2” in from the edge of the product on either side with four nails per side equally spaced starting at the edge and ending at the opposite edge.
Nail SmartVent to the roof decking using 1 ½” – 2” roofing nails. Ensure nails penetrate all the way through the roof decking. Use at least four nails per side per piece.
In each SmartVent box are pieces of fabric (approx. 10 ½” square) that will be used to seal the gable ends. Wrap the fabric around the end of a piece of SmartVent. When using the fabric, install the piece so that an equal amount of fabric is on top and on the bottom. Nail the fabric to the roof and bend it around the piece of SmartVent.
Position the SmartVent piece over the ridge so that it is nearly centered over the ridge opening. Fold SmartVent over the ridge and secure to the roof decking using 1 ½” roofing nails minimum (ensure nail goes through the roof decking). Ensure you start flush with the gable edge & wrap the end fabric over the SmartVent. Attach the next piece of SmartVent by butting the end of the piece up tightly against the end of the previously installed piece.
Continue butting 3’ pieces of SmartVent until the end of the roof. Cut the final piece to fit flush with gable end and repeat step 2 to seal the end & install gable end fabric. Hang cap shingles 1/2” to 3/4” past all edges of SmartVent.
STEP 3: Install Shingles/Rubber Roof on No-Lift Side
After the SmartVent is installed, complete the no-lift side of the roof by extending the underlayment, shingles or rubber roof over the SmartVent by at least 9” or over the peak & flush with the lift side. Install cap shingles over SmartVent as you normally would. Ensure that about ½” of the shingle cap extends past the lift edge. SmartVent is strong enough
to stand up to nail guns during shingle installation. Use extra long roof nails (1 ½” to 2” nails) for securing the shingles.
Shingle cap nails should penetrate through vent and roof deck.
NOTE: Low slope roofs less than 4/12 must have the No-Lift side nailed to the low slope side. On the No-Lift side
rubber roof or shingles extend over the SmartVent sealing the No-Lift edge from weather conditions. The No-Lift edge
is nailed under the underlayment & rubber or shingles install over the No-Lift side to the lift side & nailed on the lift side.
Install cap shingles as you normally do.
Need to translate?
